


Here you can find an overview over all the datapacks I've made including setup instructions and more.
Just click on the one that you're interested in and it will expand.


latest version (v2.0.1) (1.14 and above)
1.13 version (v1.0.0)
Makes players drop their own head if they are killed by another player.
The head will drop at the location the player was killed at.
If you want the player to always drop their head, no matter who killed them, use v2.0.0 instead.
Download the zip file and place it into your world/datapacks folder. If the world is already running, run reload. That's all you need to do.
After the datapack has been added to your world, it still needs some manual editing for it to work with your own skulls.
Open up the file data/headdrop/functions/drop.mcfunction and add one of the following lines for each of your players, obviously replacing Playername with the actual name of the player:
execute at @a[scores={headDeath=1..},name=Playername] run summon item ~ ~ ~ {Item:{id:player_head,Count:1,tag:{SkullOwner:Playername}}}
Skulls that are dropped like this won't stack with the ones that have been placed and broken again, because the game converts the name of the SkullOwner into the texture.
If you have any questions, concerns, praise or found a bug, you can contact me directly at contact@plagiatus.net or use my contact form.
latest version (v2.0) (1.21.5+)
v1.2 (1.16)
v1.1.1 (1.14 - 1.15)
Video of this datapack in action
Homes allow you to save positions in the world and teleport to them whenever you want, including different dimensions.
This Datapack allows you to set unlimited homes in any world. The players of the world don't need OP to use the commands.
Download the zip file and place it into your world/datapacks folder. If the world is already running, run reload. That's all you need to do.
You can look at the ingame-help for the datapack by running
/trigger home.help
But while you're here you might as well read the long explanation below ↓
Starting in v2.0 there is a setting to limit the maximum amount of homes a player can create.
/scoreboard players set maxHomes home.settings XX
Replace XX with the maximum amount. Any value below 0 disables the maximum. Changing this setting later will not remove excess homes from players, just prevent them from creating new ones if they would be above the limit.
/trigger. /trigger home.help
Display the ingame help page.
/trigger home (set #)
Teleport to one of your homes. Defaults to Home #1 if nothing else is specified.
/trigger home.set (set #)
Set a new home location. This command will also override a home if set to an existing number.
/trigger home.delete (set #)
Deletes the specified home.
/trigger home.list
Lists all your homes in a list with their ids, coordinates and names.
/trigger home.rename (set #)
(was home.set_name before 2.0)
Sets the name of the specified home to the name of the item in your hand. The item needs to be renamed in an anvil for it to work. If it isn't or your hand is empty, it will not change the name.
You can use /function homes:uninstall to remove all the scoreboards from the game. This will however not remove the saved homes from the game. To remove those, run /data remove storage homes:homes homes.
If you want to move your spawnchunks, you'll have to run this command afterwards to keep the datapack working:
teleport @e[type=area_effect_cloud,tag=pla_home] x y z
replace x y z with your new worldspawn coordinates.
To remove all traces of the pack from your world you can run the homes:uninstall function before you deactivate the datapack (or delete it from your world folder). This will remove all set homes for everyone as well as remove all the scoreboard objectives it's using. If you just deactivate the pack and reactivate it again afterwards, all the homes will still be there.
If you have any questions, concerns, praise or found a bug, you can contact me directly at contact@plagiatus.net or use my contact form.
28.06.2025 Rewrote the entire thing for 1.21.5, now using storage instead of area effect clouds.
29.06.2020 Updated to 1.16
13.10.2019 Removed the replace:true from the load and tick. No clue how they ended up in there.
5.4.2019 Multidimensional Support
4.5.2019 released
1.16 version (v2.2.0) (1.16)
1.14/1.15 version (v2.1.0) (1.14 - 1.15)
1.13 version (v2.0.2)
1.12 version (v1.0.0)
playersSleepingPercentage gamerule.It is advised that you use that instead.
This Datapack is intended for larger survival servers. It allows the OPs of the server to set a percentage of players required to sleep to skip the night. So if you want to skip the night if half of the players playing are in a bed, set the percentage to 50%.
When a player is trying to pass the night, a message in chat with how many players are left as well as an advancement will make other online players aware of this intent.
Download the zip file and place it into your world/datapacks folder. If the world is already running, run reload. That's all you need to do.
That way it has been set to 10% as a standard. To change that, use the following command in chat (replace XX with your desired percentage):
scoreboard players set requiredPercent multSleep.count XX
This number can be changed at any time you want.
This datapack will...
skip.mcfunction file for this one If you have any questions, concerns, praise or found a bug, you can contact me directly at contact@plagiatus.net or use my contact form.
24.06.2020 Update to 1.16
19.04.2019 Update to mc 1.14
11.01.2019 made the pack more reliable on laggier servers. Prevented a double night skip from happening.
11.08.2018 fixed a small bug that would sometimes cause the toast notifications not to show up as well as not skip the night in specific circumstances.
updated to mc 1.13
latest version (v1.2) (1.13+)
(v1.1) (1.13+)
(v1.0) (1.13+)
This datapack will allow you to easily pre-generate/preload your world, for when you want to play e.g. survival and don't want your server to be generating the world (aka lagging) while you're exploring for the first few thousand blocks. This is especially important in multiplayer.
This datapack is intended to be run BEFORE you play in a world, but will still work after you've played for a while as well.
This datapack has only been tested in singleplayer and it is recommended that you use it in singleplayer or on a server where you're the only one online. While it shouldn't cause any issues to do it on a server (except for the lag you're trying to prevent when doing this), you should not do that unless you have to!
Download the zip file and place it into your world/datapacks folder. If the world is already running, run reload. Then join the world if you aren't already, make sure all the settings are correct and run the function command that starts the process.
The generation will use the player to load all the chunks, this is why it's important to set the settings correctly. Make sure you go through ALL the settings and make sure they are correct. All of these settings have a default value. If you're fine with those values, you can keep them that way.
To change a setting, run this command in chat, replacing <settingName> with the name of the setting you want to change and <value> with the value this setting should have now.
/scoreboard players set <settingName> pl.settings <value>
All settings are scoreboard scores, which can be shown by setting the scoreboard pl.settings to be viewed on the sidebar like this:
/scoreboard objectives setdisplay sidebar pl.settings
Default: 1
If setGamerules is set to 1, it will set the gamerules doDaylightCycle, doWeatherCycle and doMobSpawning to false at the beginning and to true at the end of the generation. Set it to 0 to disable this functionality.
Please note that the spectatorsGenerateChunks gamerule will always be set to true, no matter what these settings are.
Default: 8
You need to set renderDistance to your clients (singleplayer) or your servers (multiplayer) render distance, as that is important for the size of the steps the generation can make. You can also set it to a lower number than your actual render distance for a less resource intensive generation.
Default: 40 (2 seconds)waitTime describes the amount of ticks (there are 20 ticks per second) between each step of the generation. If your computer is stronger, you might be able to decrease this value (I'd recommend not to go below 20), if your computer has trouble keeping up, increase this number.
This, together with renderDistance is the factor with the biggest impact on your processor, so tweak as necessary.
Default: 0
The center position around which you want to pre-generate your world can be set using X and Z. These values are independant of each other.
Default: 1024
To set the size of your pre-generated area, use DX and DZ. These describe the side length of the generated area, centered around X and Z (not around worldspawn!). This means that the default value of 1024 will pre-generate the area from -512 ~ -512 to +512 ~ +512 (assuming X and Z are set to their default of 0). These values are independant of each other.
Be aware that the generated area is at least the size given in DX and DZ, and will most likely be a little bit bigger depending on many factors.
Default: 1
You can set which dimension you want to pre-generate. For this, set each of overworld, nether and end to either 1 (pre-generate) or 0 (don't pre-generate). You cannot set different settings (generation size, wait time etc) for different dimensions, so if you want/need that, you'll have to run them one after the other.
This is the only setting that is changed to 0 after a run is completed to prevent accidental re-runs!
Once all the settings are set appropriately, run the following command as the player in the game:
/function preload:run
After this, you will be teleported around a lot. Once the process has finished, you will be teleported to the worldspawn. The actionbar will inform you about the current progress.
This process takes a while and only runs while the player is in the world!
If for whatever reason you want to abort the generation, you can run the following command:
/function preload:run/done
Please note that you will not be able to resume the generation once aborted and will have to restart!
If you wish to uninstall/remove the pack, run the following function before you remove it, so you don't have any leftover data in your world that you don't need:
/function preload:uninstall
If you have any questions, concerns, praise or found a bug, you can contact me directly at contact@plagiatus.net or use my contact form on my website.
09.05.2020 Used spectator mode and absolute heights for better useability. Also added an estimate for the time needed.
10.03.2020 Added X and Z Settings and their functionality
27.02.2020 Created Pack
MC 1.21.5+ version (v1.1.5)
MC 1.21.2 - 1.21.4 version (v1.1.4)
MC 1.21 - 1.21.1 version (v1.1.3)
MC 1.20 - 1.20.4 version (v1.1.2)
MC 1.17 - 1.19 version (v1.1.1)
MC 1.14 - 1.16 version (v1.1)
Video of this datapack in action (outdated, 1.21+ doesn't use floorcrafting anymore)
This datapack allows for the creation of super sponges that effectively remove all water in a large area.
1.21 and above
Using 6 sponges and 3 nether stars in a crafting bench will give you the sponge. It's using vanilla recipes now, so it's easily adjustable.
1.20.4 and below
Craftable by default by throwing 6 regular sponges and 3 nether stars onto the ground together. Can easily be adjusted to whatever fits your servers needs. (If you need help with that, feel free to reach out).
Download the zip file and place it into your world/datapacks folder. If the world is already running, run reload. That's all you need to do.
That way it has been set to 10 blocks range. To change that, use the following command in chat (replace XX with your desired range):
/scoreboard players set maximum fillsponge XX
This number can be changed at any time you want.
Be aware that using this sponge especially with higher maximum numbers will lag the server!
You can easily customize which blocks you want the sponge to replace.
For this, open up the replace.json file located inside the pack at SuperSponge_vXXX/data/fill_sponge/tags/block(s)/replace.json and change the values tag to be whatever you want to replace.
Here are three examples that you can download (rightclick > save target as). You'll need to replace the replace.json file with one of these, renaming it to replace.json.
| file | value |
|---|---|
| replace_water (default) | "minecraft:water", "minecraft:kelp", "minecraft:seagrass", "minecraft:tall_seagrass", "minecraft:bubble_column" |
| replace_lava | "minecraft:lava" |
| replace_underground | "minecraft:dirt", "minecraft:grass_block", "minecraft:stone", "minecraft:andesite", "minecraft:granite", "minecraft:diorite" |
If you have any questions, concerns, praise or found a bug, you can contact me directly at contact@plagiatus.net or use my contact form.
28.07.2025
26.08.2024
08.07.2019 fixed a bug that would cause it to ignore bubble columns. Added multiple replace.json files.
06.07.2019 created the pack
A small datapack that turns your realm into hardcore mode, by putting everyone who dies into spectator mode.
Has a mode for "super hardcore", aka one person dies, everyone gets set to spectator, starting version 1.1.
MC 1.21 (v1.3.1)
MC 1.18 - 1.20 (v1.3)
MC 1.16 - 1.17 (v1.2)
v1.1
v1.0
All versions have been created and tested with 1.16 only, but should all work in 1.13 or above. Please contact me if you run into any issues.
This datapack will turn your realm basically into a hardcore world, by putting anyone who died once into spectator mode. Or, if you configure it that way, it will even set everyone into spectator mode if even ONE player dies.
Download the zip file and place it into your world/datapacks folder. If the world is already running, run reload. That's all you need to do.
Realm
You can add the datapack directly when creating the world.
Realm
Create the world on singleplayer and upload it to your realm after that.
To change the world to super hardcore (aka if any player dies, everyone gets set to spectator mode), just run this simple command in the chat:
/scoreboard players set #superHardcore deaths 1
To set it back to "normal" hardcore, change the 1 to a 0.
Please note: once someone died while it was set to super hardcore, it doesn't automatically reset everyone else who didn't die if you set it back to normal!
In version 1.3 the "super hardcore light" mode was introduced, which gives the server as a whole a contingent of lives. To enable it, just set the amount of lives your server should have available through the same command as above.
/scoreboard players set #superHardcore deaths X
where X is the total amount of deaths you want to allow.
Please note: In this mode individual deaths don't cause a change to spectator mode, so a player might die multiple times and take away multiple deaths from the amount of lives available.
If you have any questions, concerns, praise or found a bug, you can contact me directly at contact@plagiatus.net or use my contact form.
latest version (v1.0.0) (1.13)
This datapack allows you to have individual timers, show the remaining time in the actionbar and send a message as well as a title to the player once their timer is up.
Download the zip file and place it into your world/datapacks folder. If the world is already running, run reload. That's all you need to do, the pack will set up all it needs itself.
All of the controls are run through trigger commands. To set the value of a trigger, run /trigger <triggername> set|add <value>.
/trigger <triggername> add 1 can be abbreviated as /trigger <triggername>.
All timers are personal timers. There are no global timers in this pack.
The basic control triggers are as follows
timer.starttimer.stoptimer.pausetimer.start.There are a bunch of different options you can set and use to run the timer.
timer.seconds
The amount of seconds the timer should use when starting a new timer. Default: 0
timer.minutes
The amount of minutes the timer should use when starting a new timer. Default: 10
timer.hours
The amount of minutes the timer should use when starting a new timer. Default: 0
timer.showSecond
1+: Shows the seconds left in the actionbar.
0-: Doesn't show the seconds left.
Default: 1
timer.showMinute
1+: Shows the minutes and seconds left in the actionbar. Overrides the showSecond setting.
0-: Doesn't show the minutes left.
Default: 1
timer.showHour
1+: Shows the hours, minutes and seconds left in the actionbar. Overrides the showMinute setting.
0-: Doesn't show the hours left.
Default: 1
timer.showTitle
1+: Shows a title at the end of the timer.
0-: Doesn't show a title at the end of the timer.
Default: 1
timer.sendMsg
1+: Sends a message to the chat at the end of the timer.
0-: Doesn't send a message at the end of the timer.
Default: 1
This datapack uses the worldborder for accurate, lag-friendly and not by lag affected timing. That in return also means that it is...
If you have any questions, concerns, praise or found a bug, you can contact me directly at contact@plagiatus.net or use my contact form.
14.02.2019 Published the first version
latest version (v1.0) (1.16+)
This datapack adds a little text to beehives and bee nests items that displays the amount of bees that are inside of it. No more counting and hoping it includes 3 bees, just mine it with a silk touch pick and get the info directly.
Download the zip file and place it into your world/datapacks folder. If the world is already running, run reload. That's all you need to do.
If you have any questions, concerns, praise or found a bug, you can contact me directly at contact@plagiatus.net or use my contact form.
20.03.2021 released
latest version (v1.1) (1.21.4)
v1.0 (1.20)
It basically adds the elevator blocks from the OpenBlocks mod to the vanilla game.
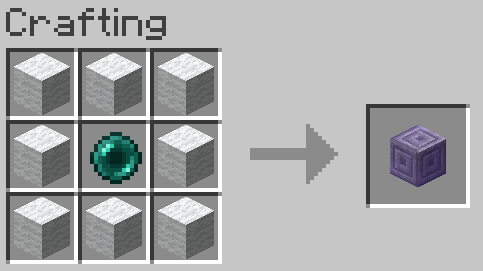
The elevator blocks can be crafted from 8 wool surrounding an ender pearl in a crafting bench.
When placed on the same x/z coordinate and jumping / sneaking, they will teleport you up / down to the next elevator directly above / below. An elevator is only considered operational if the two blocks direcly above it are air.
By default, all elevators link to all elevators, but through the settings you can enable colors mode, which allows you to dye elevators and link only elevators with the same dye.
Also in the settings you can set an xp cost to use an elevator.
Thanks to new tech introduced in 1.20, you can even camouflage your elevator block by just rightclicking it with any block.
To remove an elevator, hit it with a pickaxe.
To show some basic help in-game, use /trigger elevator.help.
Download the zip file and place it into your world/datapacks folder. If the world is already running, run reload. That's all you need to do for it to start working.
However, have a look at the following settings to customize your experience.
This datapack comes with some settings that you can adjust to customize your experience. All settings are changed by running this command in chat:
scoreboard players set <setting> elevator.settings <value>
Default: 384
Limits the maximum distance an elevator can teleport a player. By default it's the entire world height. Setting it to a value below 3 will render all elevators useless.
Default: 0
If set to 1, elevators will only teleport players to elevators with the same color. It is recommended to also enable showColor when turning this on. Rightclick an elevator with a dye to change its color.
Default: 0
If set to 1, elevators will display the color they have been set to with a small particle. Also useful to see where elevators are.
Default: 0
A value >0 required players to pay with this amount of experience points (not levels!) to use an elevator. If they have less XP than this value, they won't be able to use an elevator.
In case some parts of the datapack don't work as expected anymore (crafting, placing, breaking, interacting), here is a simple steps you can take to try to resolve them:
Because a lot of things are triggered through advancements, so running advancement revoke Player from elevator:root should reset those triggers for the "Player". This should fix most issues.
If you have any questions, concerns, praise or found a bug, you can contact me directly at contact@plagiatus.net or use my contact form.
08.12.2024
23.05.2023 released
Please note: Due to a limitation of how custom crafting could be done at this time, the elevator block looks like a jigsaw block and is also called that until crafted.
v3.19 (1.19)
v3.18 (1.18.2)
v3.17 (1.17.1)
v3.0 (1.16)
v2.0 (1.13)
If you're using the old version, a lot has changed since then in terms of features. For that reason you can find the old instructions below.
The premise is easy: Find every item in the game and return it to the shrine.
The problem: There are 888 different items in the game obtainable in survival.
All you have to do is move up to the shrine (of your team) and place the items you want to register into the chest. Be aware that that will consume the item (if it hasn't been handed in before). Note that you need to stand close to the shrine to activate and actually check your items, or it won't work.
You can toggle a number in the actionbar that displays the total amount of found items of your team, by using /trigger displayScore 1/0 in chat.
Your progress will also be tracked on the advancement screen. There you can see what items you have already collected and which ones are left.
Around the shrine, once placed, is an "adventure mode" area, that will prevent you from building or breaking any blocks in close proximity to the shrine.
It will also protect itself against creeper explosions.
In the 3.0 Version of this datapack, I've added Teams, multiple shrines and a possibility for custom advancement layouts.
Download the zip file and place it into your world/datapacks folder. If the world is already running, run reload. That's all you need to do. Now you need to find a good place for the shrine(s) to be placed.
if you think you've found that place, stand there and run
/function itemchallenge:spawn_shrine
After placement you'll notice the adventure mode aura around the shrine. If you want/need to place blocks around the shrine, you have to switch to creative mode. The only things you must not change about the shrine is the chest, hopper and dropper.
You can place as many shrines as you want. Just make sure they don't overlap, so keep a few blocks distance between them.
To be able to fully remove a shrine you'll need to stand where the shrine is/was located and run
kill @e[type=area_effect_cloud,tag=itemchallenge,limit=1,sort=nearest]
to remove the marker entity that marks the position of the shrine. You know it worked when the dropper stops clicking even when players are close.
The signs in the shrines will automatically update, but only if they are placed in the positions they are already in. They show the teamid and current score. They also allow players to join that team. You can enable/disable this functionality by setting signJoinEnabled in ic.settings to either 0 or 1.
/scoreboard players set signJoinEnabled ic.settings 0
Please note that the signs as well as the actionbar display have some delay in their updates, for performance reasons.
You can break the signs and customize their rotation and type. Also line 3 is free for you to fill with whatever you want.
Teams are represented by a number. A newly spawned shrine will be in team 0 by default.
You can change a shrines team by standing at the shrine and running
/scoreboard players set @e[type=area_effect_cloud,tag=itemchallenge,limit=1,sort=nearest] ic.team <teamNumber>
replace <teamNumber> with the number of the team you want the shrine to join. By assigning a shrine to a new number, that team will be created automatically. You can change a shrines number at any time.
Please note:
Since the full list of items in the advancement screen is hard (and laggy) to read, it is highly recommended to use a custom layout instead.
There is currently 1 custom layout available for download:
Download your desired layout, put it into the datapacks folder and make sure it is applied on top of the itemchallenge base pack.
I have written a small script that allows you to create your own layouts fairly easily. Download here, unzip it into your datapacks folder and read the instructions inside the itemchallenge_advancements_override/generator folder. You need node.js to run this script.
Of course you can also create your own layout from scratch, as long as you keep the file names I've established it will work no problem.
This is somewhat advanced and is not recommended for beginners.
If you came up with a cool pack that has an interesting grouping, please share it with me and if I like it, I'll put it up to download on this page here as well.
If you have questions or run into any issues with this, let me know (contact see below).
The premise is easy: Find every item in the game and return it to the shrine.
The problem: There are 704 different items in the game obtainable in survival.
All you have to do is move up to the shrine and place the items you want to register into the chest. Be aware that that will consume the item.
The number in the actionbar displays the total amount of found items.
Your progress will also be tracked on the advancement screen. There you can see what items you have already collected and which ones are left.
Around the shrine, once placed, is an "adventure mode" area, that will prevent you from building or breaking any blocks in close proximity to the shrine.
It will also protect itself against creeper explosions.
Download the zip file and place it into your world/datapacks folder. If the world is already running, run reload. That's all you need to do. Now you need to find a good place for the shrine to be placed.
if you think you've found that place, stand there and run
/function itemchallenge:spawn_shrine
Make sure you have found the best spot, as having mutltiple shrines will break the pack.
After placement you'll notice the adventure mode aura around the shrine. If you want/need to place blocks around the shrine, you have to switch to creative mode.
Originally created for Hardcore Hermits, a series on the Hermitcraft Server. Idea by Xisumavoid.
It is possible to play this datapack in multiplayer, but the scores are counted for the whole world and not individually per player.
That is why there is a "episode" mechanic built into this datapack. If you are a youtuber yourself and want timed 20 minute Episodes to play by, use
/trigger startEpisode
to start the timer. When the episode is over, you will get a message in chat as well as a title on screen informing you that it is over.
Using this feature will stop the daylight circle once the episode is over and reenable it when a new episode is started!
The most common problem is that an item isn't detected eventhough it should be. That is most definitly because of one reason:
As soon as no player is in close proximity to the shrine anymore, the shrine stops detecting items (for lag reasons). So if you put in an item to get detected, just wait around the shrine for a few seconds,
that way you can be sure it's detected correctly.
If you have any questions, concerns, praise or found a bug, you can contact me directly at contact@plagiatus.net or use my contact form.
latest version (v1.0) (1.13.1)
minecraft 1.14 version, tested in 18w45a (v2.0) (1.14) this one has a bunch of changed mechanics that alter the game in itself, for all the details check out Xisumavoid's Video about them.
Find and kill every mob in the game. It's as easy as that.
There are 52 (+4) mobs in this game that can be killed. This pack tracks 55 of them.
(The +4 are giant, illusioner, zombie horse, and other players, which aren't neccessarily available in the game. The later 3 are part of the pack.)
(In 1.14 there are a total of 62 mobs, the only one not tracked is the giant.)
Download the zip file and place it into your world/datapacks folder. If the world is already running, run reload. That's all you need to do.
Originally created for Hardcore Hermits, a series on the Hermitcraft Server. Idea by Xisumavoid. Heads, the zombie horse spawning and the changed loottables in the 1.14 Version by MSpaceDev.
It is possible to play this datapack in multiplayer, but the scores are counted for the whole world and not individually per player.
A second pack that tracks per player is in the works.
When in multiplayer you kill a mob while another player is offline, they won't recieve the updated advancements when they come back online until someone kills something they haven't killed yet.
If you have any questions, concerns, praise or found a bug, you can contact me directly at contact@plagiatus.net or use my contact form.
latest version (v1.0.1) (1.16+)
v1.0 (1.16+)
This datapack adds 25 handpicked deeds to the game. Subject of the 5th Clash of the Creators Event. They will trigger for every player individually.
Download the zip file and place it into your world/datapacks folder. If the world is already running, run reload. That's all you need to do.
If you have any questions, concerns, praise or found a bug, you can contact me directly at contact@plagiatus.net or use my contact form.
fixed a small issue that cause the dragon head advancement to not trigger correctly
23.03.2021 released


